| Setup
Ubuntu and XBMC |
- Start by installing Ubuntu to the SDHC
card (can install from USB CD/DVD ROM drive or USB flash memory stick)
- NOTE: During the installation, configure
the SDHC card to consume the complete partition. The format type should
be ext2 - you don't want to use a journaling filesystem with a flash
card. Also, because you are using an SDHC card, you will NOT want to
turn on SWAP (hence the reason you purchased 4GB of memory :-) )
- NOTE: During setup, Ubuntu will prompt
for if you want to auto-login - yes you do, unless you want to have to
type a username/password everytime the HTPC boots up.
- Once Ubuntu setup completes, execute the
"Update Manager" and ensure you system is up to date
- Setup the system to run efficiently from
an SDHC card. Following these steps will allow you to minimize writing
to the SDHC card.
- Mount the filesystem with noatime
(file last accessed not written), and use ram to hold temporary files.
- sudo vi /etc/fstab
Replace relatime
with noatime
(if relatime isn't present, you want to add noatime
to /dev/sdc1. It should like
something like:
UUID=blahblahblah / ext2 noatime,errors=remount-ro 0 1
Add the line:
tmpfs /tmp tmpfs defaults,noatime,mode=1777 0 0
reboot
- Setup firefox to use tmpfs as
well, open up a browser and in the address bar:
about:config
right click, and add a new string value:
browser.cache.disk.parent_directory
/tmp
- Lastly, turn off gnome-keyring as it is
annoying and will prompt you for your keyring password at inopportune
times
- System->Preferenes->Startup
Applications
- disable: Certificate & Log
Storage, Secret Storage Service, SSH Key Agent
- When you are prompted for the
default keystore (for example when you are setting up Remote Desktop,
just hit <ENTER> twice
- For ease of remote management...
Enable System->Preferences->Remote Desktop
- Allow others to connect
- Allow others to control
- Require password (then type in your
password - you
will probably get the gnome-keyring prompt just use
<ENTER> twice)
Install sshserver
- sudo apt-get install openssh-server
- For the Zotac boards, you need to install
the NVidia ION drivers to enable the HDMI output
- Download the latest drivers to your home
directory. http://www.nvidia.com
- NOTE: In order to install and build
the new driver, please ensure that you have also performed the
following:
sudo apt-get install
linux-headers-`uname-r`
sudo apt-get install make
sudo apt-get install gcc
- Shutdown gdm and do the remaining steps
from the command prompt:
Shutdown gdm: sudo
/etc/init.d/gdm stop
Go to the location of the NVidia driver
(in my case,
on my Desktop):
sudo chmod 775
<filename>
And execute the installation/build script:
sh
<filename>
If the installer complains about a Nouveau
kernel
driver, the installer will install a modprobe workaround in
/etc/modprobe/nvidia-intsaller-disable-noveau.conf, you must reboot and
try the install again
Let the installer update your xorg.config
Once the installation is complete, restart
gdm: sudo
/etc/init.d/gdm start
- For the SandyBridge boards, you will need to
update the Intel driver to fully realize the benefit of using a
SandyBridge board and the HDMI output.
- As I upgraded to Ubuntu 11.10, there is a
slight change to getting the window manager to stop/restart
sudo lightdm stop; sudo lightdm
start
- To update the graphics components to get
SandyBridge to show in SysInfo
sudo apt-get install mesa-utils
sudo apt-get install libva1 vainfo i965-va-driver libva-glx1 libva-dev
sudo shutdown -r now or sudo lightdm
stop;sudo lightdm start - To verify the various components are
working
correctly, you can try the following
sudo lspci | grep VGA
sudo xrandr (to show resolutions)sudo
lspci | grep VGA
sudo lshw -C video
sudo glxinfo
sudo vainfo (to
verify that you are using the Intel drivers)
sudo lspci | grep VGA
- Install
XBMC (Ubuntu 10.10)
- First,
add the repositories to the Ubuntu
package
manager. As
Ubuntu 10.10 (Maverick) doesn't have XBMC repos yet, we are
going to use the prior repos (Lucid). From a terminal
enter:
sudo
add-apt-repository
ppa:team-xbmc
Go
to
System->Administration->Synaptic
Package Manager->Settings->Repositories->Other
Software
Select
the team-xbmc repos
(there
should be two of them)
Change
the distribution from "Maverick" to
"Lucid",
the select "OK"
Close
the Package
Manager
- Reload
the repositories
sudo
apt-get update
- Install
the XBMC packages:
sudo
apt-get install xbmc
sudo
apt-get install
xbmc-standalone
sudo
apt-get install
xbmc-event-clients-*
NOTE: this is for the remote controls.
- Install
the USB HTPC Remote Control:
- Plug
in the USB reader to a USB port
- sudo
apt-get install lirc
- During
the package setup install
screens, select:
- Windows
Media Center Remote (new
version Philips
et. al.)
- IR
Type=custom
- Install
XBMC (Ubuntu 11.10)
- First,
add the repositories to the Ubuntu
package
manager. From a terminal
enter:
sudo
add-apt-repository
ppa:team-xbmc
sudo
add-apt-repository ppa:nathan-renniewaldock/xbmc-stable
- Reload
the repositories
sudo
apt-get update
- Install
the XBMC packages:
sudo
apt-get install xbmc
- Install
the USB HTPC Remote Control:
- Plug
in the USB reader to a USB port
- sudo
apt-get install lirc
- During
the package setup install
screens, select:
- Windows
Media Center Remote (new
version Philips
et. al.)
- IR
Type=custom
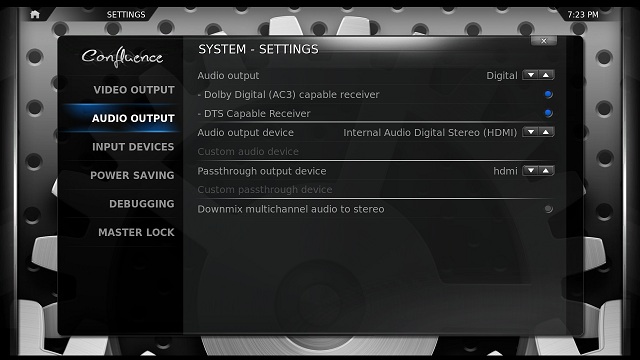
- Setup
and configure XBMC - most
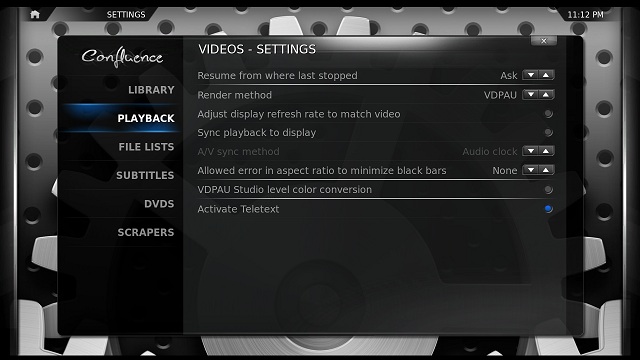
importantly turn on VDPAU/VAAPI rendering to off-load video processing to the onboard graphics chip
xbmc
-fs &
Playback->Video Settings->VDPAU
(NVidia ION)
Playback->Video Settings->VAAPI
(Intel SandyBridge)
- Setup
and configure filesharing (assuming you
are sharing your media over a network)
- sudo
apt-get install smbfs
- NOTE:
To list shares
smbclient -L //server -U user
- NOTE:
To use shares
smbclient //server/share -U user%password
- Allow
someone other than 'root' to mount
smbshares
sudo visudo
Add line in "groups" section
##members of admin group
%admin ALL=(ALL) ALL
%users ALL=(ALL)
/bin/mount,/bin/umount,/sbin/mount.cifs,/sbin/umount.cifs
- To
allow others to automount shares
sudo vi /etc/samba/user
And insert the following lines (the file is probably a new file)
username=yourusername
password=yourpassword
Save the file, now make sure no one else can read the file by changing
the permissions
as follows:
sudo chmod 0400 /etc/samba/user
- Setup the directories. I use
hardcoded directories in media, then use a symbolic link in my home
directory
sudo mkdir v1;sudo mkdir m1;sudo mkdir b1
etc...., v1=videos, m1=music, b1 = blurays, etc
Setup the fstab file
sudo cp /etc/fstab /etc/fstab.bak
Now add the following lines:
//server/share /media/v1 cifs credentials=/etc/samba/user,noexec 0 0
Repeat the above for EACH share you are putting in place
Save the file, and reboot the machine to get the mounts to load (you
can do it as root without a reboot by sudo mount /media/v1)
- Setup
and configure the display
- Plug
the display into the HTPC box
- Using
System->Display, set the Ubuntu
desktop to whatever resolution you want (e.g. 1280x720 (16x9) 60Hz for
720p)
- Set
XBMC to use the same display size (after
starting XBMC)
- Settings->Appearance->Screen->Resolution
720p 16:9
- Calibrate
your video (very important or the
movies will overlap the screen size, particularly if you are using a
projector)
- Settings->Appearance->Screen->Video
Calibration
- Adjust
the corners so you can see them
(upper left, lower right, then subtitle position)
- Lastly,
set the
System->Appearance->Screen->Screensaver
Mode->Off
- Sound
- the most difficult thing to get setup
in my opinion. Please be aware that sound generally takes
some tweaking based on your particular system. Your mileage
may vary by following the steps I used, and it is entirely possible
that there is a better way - I'd love to hear about it.
- I
used HDMI as my sound channel, however you
can also use the S/PDIF port or one of the other ports. If
you do, the settings in XBMC have to change accordingly (HDMI = hdmi,
S/PDIF = iec958)
- Apparently
PulseAudio and ALSA drivers
conflict - which will lead to NO sound in XBMC
- Start
by removing PulseAudio
sudo apt-get remove pulseaudio
gstreamer0.10-pulseaudio
- Now
purge all remaining PulseAudio files from
the system
sudo apt-get purge libcanberra-pulse
pulseaudio pulseaudio-esound-compat pulseaudio-module-bluetooth
pulseaudio-module-gconf pulseaudio-module-udev
pulseaudio-module-x11 gstreamer0.10-pulseaudio pulseaudio-utils
pavucontrol
- Install
some additional ALSA files
sudo apt-get install gnome-alsamixer
alsa-oss python-alsaaudio
- Reboot
- You
should be able to hear sound in XBMC once
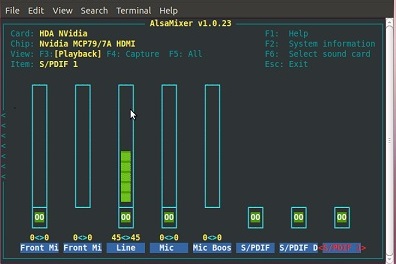
you setup your XBMC settings. To setup ALSA you can use
either the GUI or the command line applet (alsamixer)
From the GUI (Applications->Sound & Video->GNOME
ALSA Mixer)
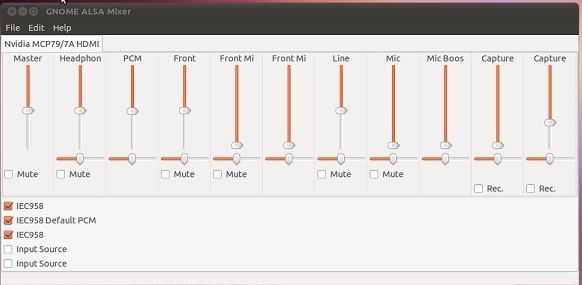
From the command line: alsamixer
(Note if the
channel shows MM it is MUTED)
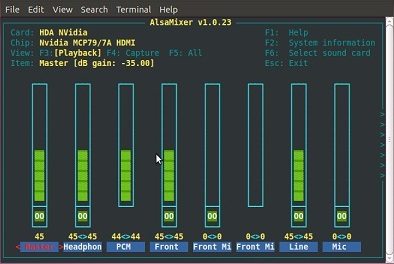
The screen is too large to show in one shot, so scroll to the right to
see the remaining channels
-
And
this
is where it gets weird...I needed sound to work in MAME as
well as in XBMC. MAME only seems to support PulseAudio reliably, so how
to get this system to work
with BOTH sound systems involved. I'm going to capture what I did as it
FOLLOWED the above
steps - if/when I set this box up again I can work on figuring out what
steps are not necessary.
So, to continue...
-
Using
the package manager, I installed libsdl1.2debian-alsa (which
uninstalled libsdl1.2debian-pulseaudio), which led to a nice quiet
MAME, so...
- Again,
using the package manager I
(re-)installed
libsdl1.2debian-pulseaudio (or you can sudo apt-get install
libsdl1.2debian-pulseaudio)
- Still
using package manager, added pulseaudio
(or you can sudo
apt-get install pulseaudio )
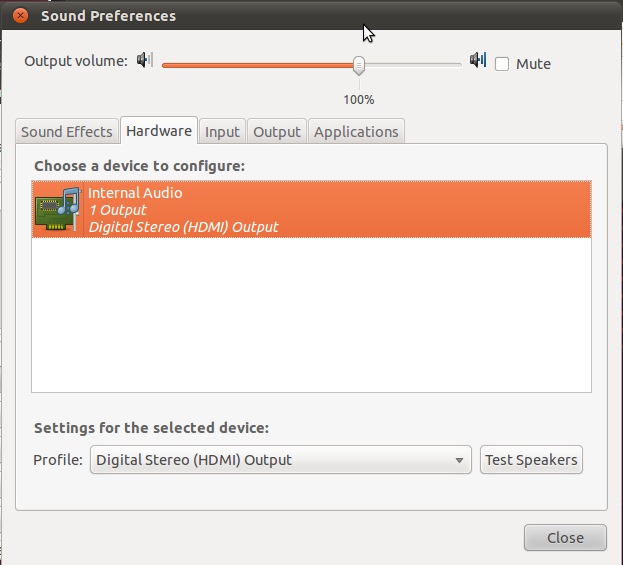
- System->Preferences->Sound,
set
it up to use HDMI as the output source
- Now
redo 'alsamixer' (see step 7) as it
likely got muted when you installed the other pacakge
- At
this point, executing MAME from the
command line and selecting a game should lead to a nice arcade sound!
- Start
up XBMC once again, you probably are
hearing navigation sounds - apparently pulseaudio is used to provide
navigation sounds, HOWEVER, you must disable navigation sounds or
you'll get problems saying the sound device cannot be initialized when
you try and play your media. Essentially, XBMC has one sound
source open, and you are trying to play another one - which leads to a
conflict which leads to no sound! To disable sounds, go to:
- Last
but not least, go back to the System->Settings->Audio
Output and
ensure that both entries read HDMI. ALSA probably reset one
of
them to alsa:plug:hdmi which won't work. (or maybe it would - try this
later?)
- Finally,
you're system is up and running.
Look
for another post on integrating MAME into XBMC for a total media
experience.
NOTE:
I ran
into a strange problem with audio - somehow my XBMC audio
was set really low so the audio was inaudiable in SOME INSTANCES - for
example, mp3 files were quiet, avi files were quiet, but Blu-ray files
sounded just fine, and Ubuntu sounded just fine. After much
investigation I finally figured out what was wrong. Use the
media
center remote and increase the volume, which you'll see the XBMC audio
volume increase and you should now hear sound correctly for all media
types. So if you can barely hear audio for some playback
formats,
but can hear it just fine for others, your XBMC audio (not your
amplifier audio) has probably been set too low.
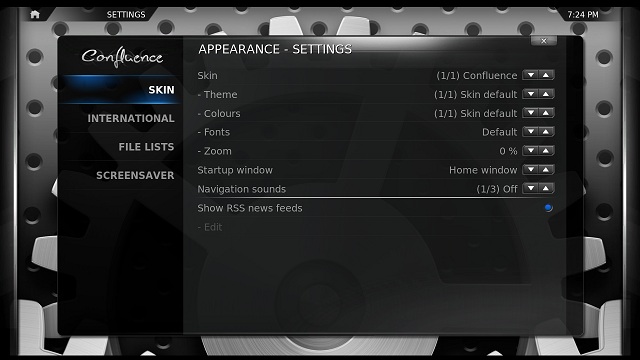
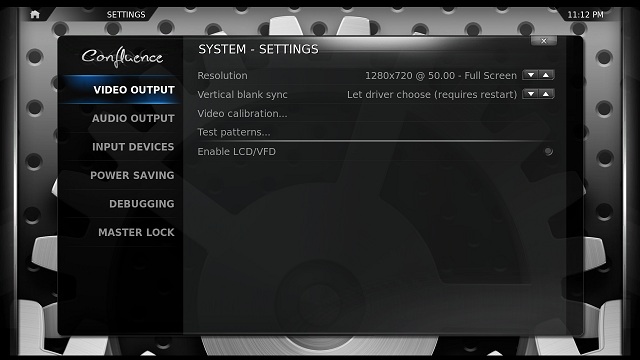
That should about do it...your XBMC system is ready for you to load
your media and get going. If you are curious, I've put a
couple screenshots of my XBMC settings. These work for me...
Audio settings:
Video settings: (Not sure why it shows 50Hz, it has done that for a
while - the display shows 60Hz when I use the system)
Navigation sound settings (note: must be OFF or movie sound won't
initialize correctly:
DVD (Video) Settings (play automatically, and skip junk prior to the
menu):

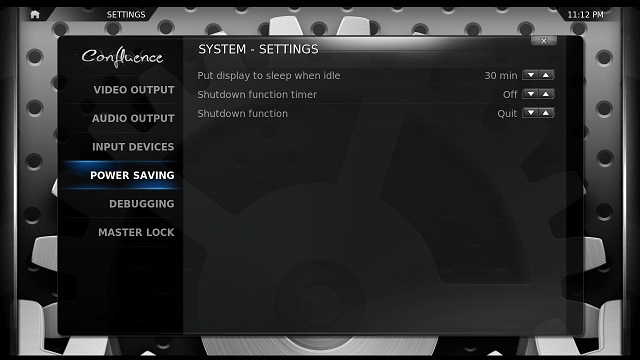
Power saving:
|
|