Ripping blu-rays to stream over your home network is a quick and simple method to incorporate your bluray movies
into your XBMC media center experience.
However, there are a couple of problems presented by ripping blurays. The first problem, is space - a bluray movie
can take up to about 50GB of space on your server. While harddrives are cheap, and space is economical, a 2TB drive can
really only hold 40 movies if they are left uncompressed.
So the movies needs to be compressed in order to conserve space, but compressed in such a way that you still get the
benefits of bluray - great picture and awesome sound!
Which leads to the second problem, using tools like Ripbot264 to compress your movies gives you great video quality
and great audio quality - however, both the video and audio streams are compressed. Well, there isn't a lot that you can do about the
video compression, and Ripbot264 does an amazing job. Not only does the video take up a fraction of the original space, but
it still looks amazing. As far as audio, Ripbot264 compresses the audio into AC-3, but what if you want the audio to
be uncompressed (original Blu-ray quality audio). Well you can, but you have to do a little post processing after Ripbot264
has completed it's task.
The goal of this walk-thru is to show the steps necessary to convert your Blu-ray .m2ts files into .mkv files with compressed
video and uncompressed audio.
First, you need to rip the bluray from it's source media and get it on your harddrive so the data can be manipulated. The example
disk I am going to use is the new Star Wars release on Blu-Ray. I'll use Episode 1 - The Phantom Menace as my source material.
A note about DVDFab - they have a lot of great ripping tools available, they regularly run specials, and they also provide bundles of tools at
discounted prices. Look around and determine what you want...I've tried their ripping and conversion tool, and I prefer the flexibility
of using other tools where I can control exactly what happens, but to each his (or her) own. Regardless, you can download the tool
and try before you buy - however, once you settle on what you like, I would recommend getting the life time subscription. This will ensure
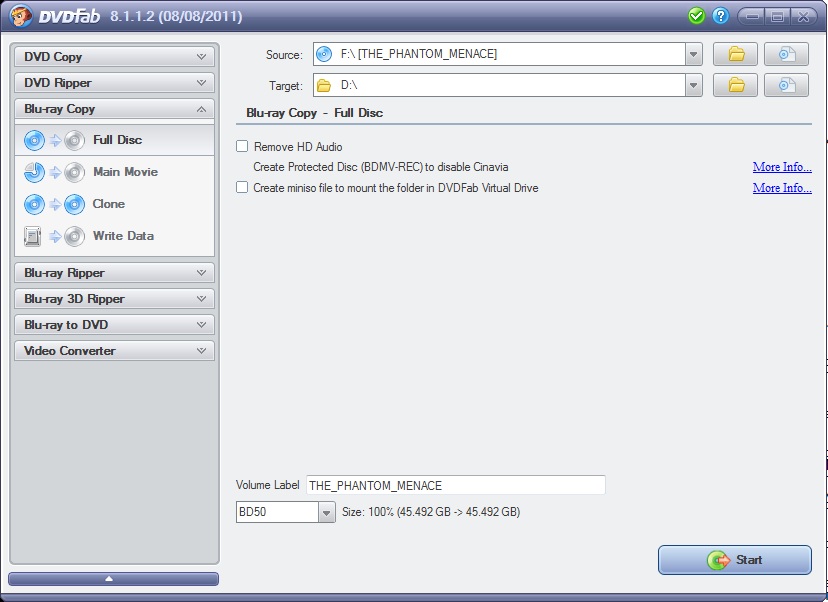
that you are always have access to the latest updates, and this is a very economical way to get the software. So, fire up DVDFab Blu-Ray Copy, and
rip the disk to your harddrive. This step will take about 45-60 minutes depending on the speed of your bluray reader.
Now that the disk is located on your harddrive, you want to run it through Ripbot264. This will turn the approximately 50GB blu-ray into
about a 8GB .mkv file. The first step is using the BDInfo tool to determine which files you are going to select for Ripbot264.
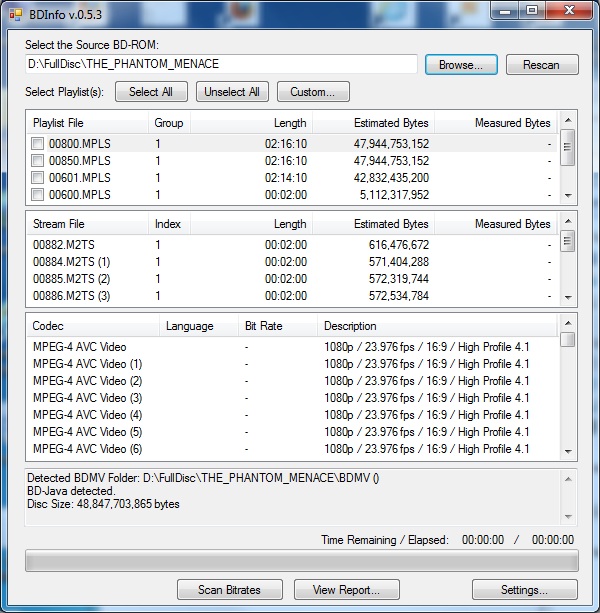
You can see here that 00800.MPLS contains the primary movie, and you want Ripbot264 to use 00882.M2TS as it's input. Now, bring up
Ripbot264, select "add", and navigate to the folder containing the stream and click on 00882.M2TS. Notice that I have chosen to include
only English subtitles. Select
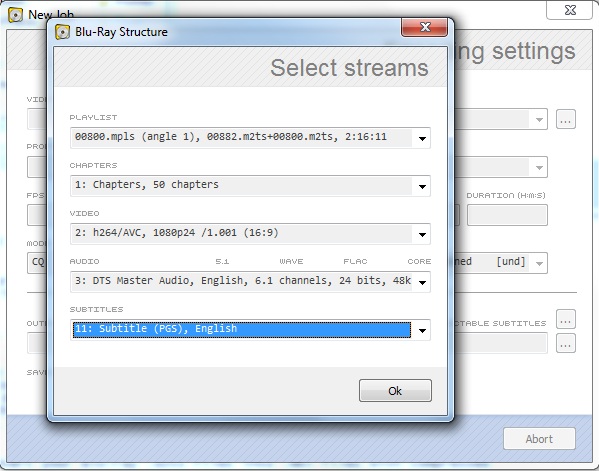
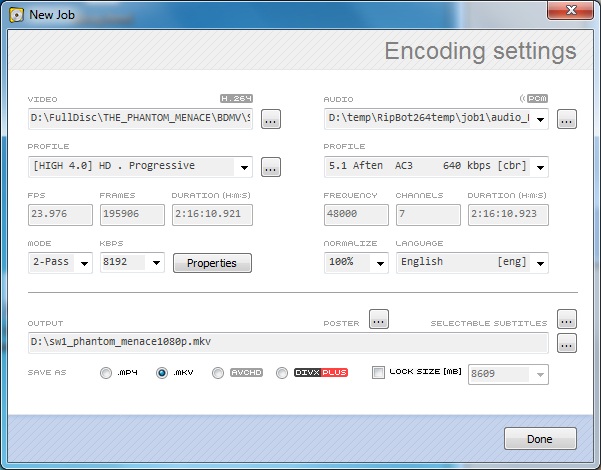
Select 'OK' and wait while it demux'es the streams. At this point, you can select your video, audio, and subtitle selections. I usually rip my media with the following
settings:
- Filetype: .mkv
- Video Compression: 2-pass/8192Kbps
- Audio Compression: 5.1 Aften AC3 640Kbps
- Subititles: embedded (from Properties->Permanent Subtitles [build in picture])

Take a break....this will take quite a while. On my Intel Core2Quad Q8200 (2.6Ghz), it takes 8-10 hours to complete the ripping and conversion process.
Once RipBot has completed, you could stop here. You have a high quality .mkv file with compressed video and compressed audio. However, if you want to add
uncompressed audio then read on...
After completing the Ripbot264 process, you can use the HD-DVD/Blu-Ray Stream Extractor to extract the uncompressed audio or you can use eac3to directly.
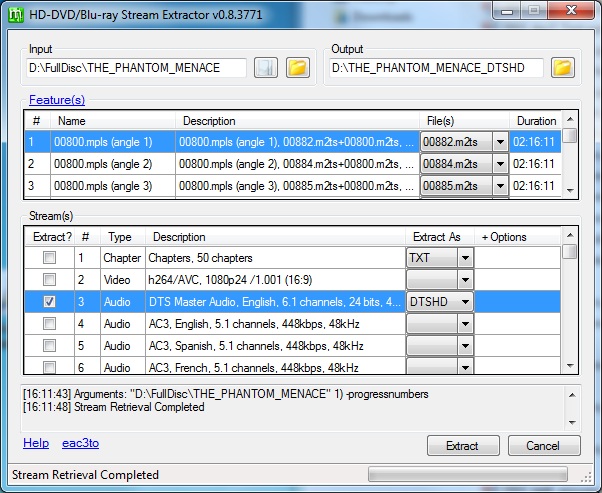 |
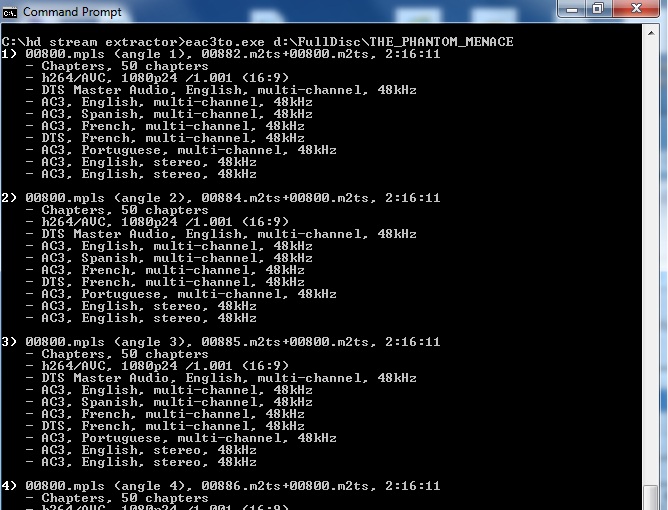
eac3to.exe "d:\FullDisk\THE_PHANTOM_MENACE"

eac3to.exe "d:\FullDisk\THE_PHANTOM_MENACE" 1) 3:"d:\THE_PHANTOM_MENACE_DTSHD\the_phantom_menace_audio.dtshd"
|
| Extract DTS-HD stream (gui) |
Extract DTS-HD stream (cmdline) |
You now have the compressed video and uncompressed audio and can use the mkvmerge GUI tool to merge and adjust the .mkv file to have the correct streams. Fire up
mkvmerge GUI and drag and drop your .mkv movie file and the uncompressed audio file onto the window. This will give you a screen as follows:
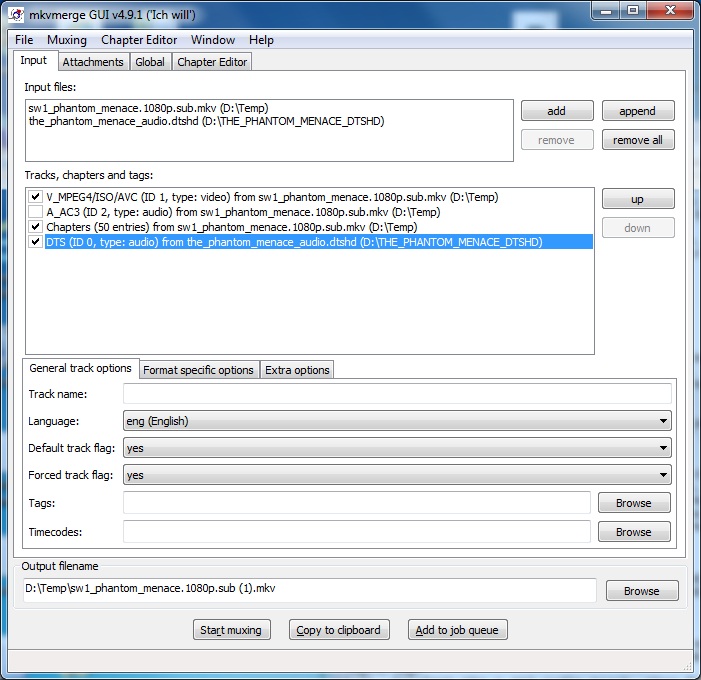
First, deselect the A_AC3 audio track, then for each of the remaining tracks, click on them once and set the language (Eng), Default Track(yes), and Force Track (yes). Once
that has been completed, click on "Start Muxing" and in 10 minutes you should have a new .mkv file with a compressed video track, embedded subtitles, and an uncompressed audio track.
NOTE: I have only been able to get DTS-HD audio to work from a .mkv container. I have been unsuccessful in getting a Dolby TRUE-HD audio file to play within XBMC (for example, The Matrix). While XBMC theoretically support TRUE-HD and streams it over the 7 channel PCM connections, I only consistently get the front audio channels and am missing the rear surrounds.
You can verify that your conversion was successful, by dragging the .mkv file onto MediaInfo
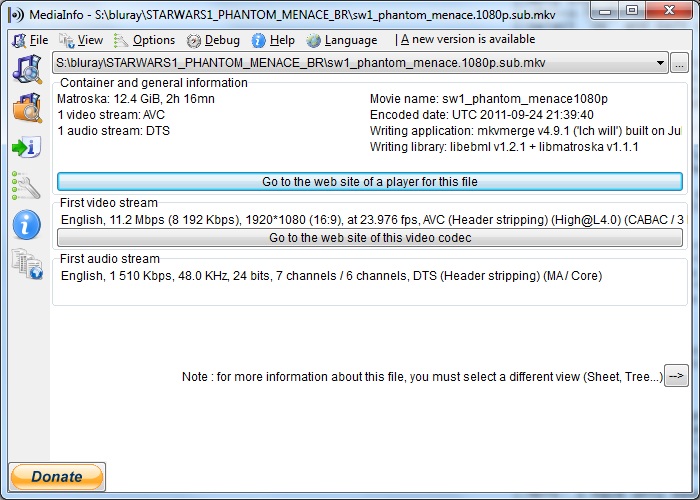
Here you can verify that you have:
- Video stream (AVC), 8192Kbps, 1920x1080 @ 23.976fps
- Audio stream (DTS), DTS MA/Core, 6-channel audio, 1510 Kbps @ 48.0 KHz/24bits/7 channel
In this case, for Star Wars Episode I - The Phantom Menace using uncompressed audio increased the filesize from 8.39GB to 12.3GB.
|